This series is proving a lot more popular than I’d figured. Who would have thought so many people enjoy noodling around with Web servers? By popular demand, “Web Served” now enters the bonus round with two things I didn’t think I was going to be able to get to: MediaWiki in this piece, and Etherpad Lite in the next.
Wikipedia is a staple of the World Wide Web, used by millions of folks every single day. From casual readers checking a quick fact to journalists who need to verify esoteric details of a story to students too lazy to go to the library and consult more reliable primary sources, it’s the go-to crowdsourced information site on the Internet.
Wikipedia is powered by a PHP-based application called MediaWiki. The concept of a “wiki” is simple: MediaWiki provides a framework where anyone can create pages, which can be edited by anyone else. The usage isn’t limited to an encyclopedia—MediaWiki can power any kind of collaborative environment. Want to set up something for a working team to quickly throw ideas against the wall? MediaWiki can do that. Want to set up a photo library or other document repository? MediaWiki can do that. Want to make your own documentation library, complete with version tracking? MediaWiki can do that.
It is by no means the only game in town—there are lots of different wiki applications, including DokuWiki (which I used for a while and very much like) and Foswiki—in fact, there’s an excellent wiki comparison page here (though the fact that I’m linking a Wikipedia page should tell you something about what the dominant application is). DokuWiki is particularly nice, because it can be skinned to look very much like Wikipedia and it doesn’t require a database, storing all of its pages as flat files.
However, MediaWiki is the big dog, and if you want to set up a wiki, it’s the one you’ll most likely want to go with.
Thoughts on security
Just a small sampling of the spam accounts a wiki can collect.
Credit:
Lee Hutchinson
Just a small sampling of the spam accounts a wiki can collect.
Credit:
Lee Hutchinson
The very concept of a wiki is at odds with a lot of the normal ideas of security. In its purest form, a wiki should encourage even anonymous collaboration and shouldn’t restrict the creation of accounts and the addition or modification of content by anyone. This can be seen with Wikipedia, where anyone really can edit anything (within certain limits and rules imposed by the gatekeeping editors). However, controlling spam accounts is difficult. I run a wiki for documenting the cool stuff folks have made on my Minecraft server, and spam account creation is an unstoppable force.
Fortunately, MediaWiki has role-based security model, so you can require accounts to be added to a security group before they are allowed to post. This adds administrative overhead—as in, it gives you the administrator more stuff to do—but for a personal wiki it’s not at all a problem.
MediaWiki’s popularity also makes it a pretty big attack target, and a large number of the vulnerabilities MediaWiki sites get hit with come from unmaintained plug-ins. As with WordPress, you should only install a MediaWiki plug-in if you are absolutely sure you need it, and you should keep your plug-ins up to date to avoid vulnerabilities.
Prerequisites
MediaWiki works with a number of different databases, and since we’ve already got MySQL installed, we’ll use that. You’ll need to create a new user and database for MediaWiki to use. By now, you should be familiar with how to do this—if not, check part 5 or part 6 for the details. Creating a new database and user for each Web application is a good idea because it limits the amount of damage that can be done if the Web application is compromised—it helps keep an attacker’s access limited only to the database controlled by the compromised application.
Creating a new database isn’t always an option if you’re using a Web hosting service—some give you only a single database to use among all your applications. Since we’re self-hosting, we have no such restrictions.
After you’ve created a MediaWiki database and user—which for this tutorial I’ll assume are both named “wikidb”—you’ll need to install a collection of utilities called ImageMagick, if it’s not already installed. MediaWiki (and other Web applications you might want to install in the future) use ImageMagick’s various utilities to modify the pictures you upload—most obviously, ImageMagick is used to resize images to provide thumbnails. Launch a root shell and install the ImageMagick package with aptitude:
aptitude install imagemagick
Installing MediaWiki
MediaWiki is available as a package you can install with aptitude, but the problem with installing an application like MediaWiki from the official curated sources is that it can take time—sometimes weeks or longer—for the official sources to be updated with new versions. Plus, those updates, when they come, are typically only done in response to security issues, not new features.
MediaWiki is a popular enough attack target that we want to make sure we always have the most current stable version installed, and to do that we need to install and maintain the application directly from the MediaWiki Foundation. It’s possible to use Git (which we installed in part 6) to clone different MediaWiki releases to your server, but we’re going to go for the regular old-fashioned tarball download.
The download link for MediaWiki.
Credit:
Lee Hutchinson
The download link for MediaWiki.
Credit:
Lee Hutchinson
Head to the MediaWiki download page in a browser and copy the target of the big prominent “download” link to your clipboard. This link will always point to the latest stable release of MediaWiki. As of this writing, that’s version 1.20.2.
With that link on your clipboard, return to your terminal window and change to your Web root directory and download the release using wget. After it’s downloaded, decompress it with the tar command. This will create a destination directory for MediaWiki; as with previous web apps, we’ll need to modify that directory’s ownership to your local Nginx user. We’re also going to rename the directory (with the mv command) so that its name is a little easier to remember, and then finally we’ll delete the source archive file to keep our Web root directory clean.
cd /usr/share/nginx/html
wget http://download.wikimedia.org/mediawiki/1.20/mediawiki-1.20.2.tar.gz
tar xvzf mediawiki-1.20.2.tar.gz
mv mediawiki-1.20.2 wiki
chown -R www-data:www-data wiki
rm mediawiki-1.20.2.tar.gz
Everything is now in place to add the Nginx configuration. We’ll come back to MediaWiki after we’ve got our Web server set correctly.
Nginx configuration
Many of the Nginx configuration elements here are going to be standard items that you’ll remember from before. We’re going to again modify our single www virtual host file to run MediaWiki out of its own subdirectory, giving it some locations and some security rules. We’ll also be securing the images directory in the same way as we’ve done with other upload directories, forcing the MIME types of potentially executable files to text/plain to help guard against potential attacks.
Things are going to be a bit different, though, as every app has its own unique quirks. One of MediaWiki’s is that many of its PHP files are duplicated with .php and .php5 extensions, for compatibility’s sake, so we need to ensure we’re accounting for that.
Additionally, a core component of MediaWiki’s functionality is the ability to create new pages in response to “page not found” errors. Go to Wikipedia and try to navigate to a nonexistent page—hit http://en.wikipedia.org/wiki/ and type some random string of characters at the end of the URL and hit enter. Wikipedia will ask you if you want to create that page. We’ll need to make sure to not break this functionality with our config, which we can do by leaning on the awesomely versatile try_files directive.
Because we’re going to be adding quite a few locations, we’re going to stuff most of them into an includes file like we did with our WordPress configuration in part 5. Not only will this help with the readability of your www virtual host file, but it will also mean you’ll only have to list the locations once if you’ve got both an HTTP and HTTPS section. This means fewer chances for typos.
Open up your virtual host file at /etc/nginx/sites-available/www for editing and append the following near the top, in the first set of directives after the start of the server section:
include site-configs/wiki.conf;
We haven’t created the wiki.conf file yet, but we will in a moment.
Then, below all of the other locations you’ve got for your other sites, add the following:
This sets up PHP handlers for both .php and .php5 files. If you’ve got an HTTPS section in the virtual host file, add the same include there and duplicate the two PHP locations, making sure to add fastcgi_param HTTPS on; to each.
Next, navigate to /etc/nginx/site-configs/ and create a file called wiki.conf. Add the following contents:
Lots of things going on here, but after all the practice we’ve had with past installments, some of this should be pretty obvious. First, we’re defining a location for our MediaWiki installation under /wiki/, and setting up the index.php5 file as the index file. Then, we restrict access to just our LAN, which is definitely something you want to do while you’re configuring things.
The rewrite directive is important, but we start with it commented out—we want it to be there, and we’re going to use it, but first we need to get MediaWiki operating. The directive is used to transform our URLs into nice Wikipedia-style friendly URLs rather than queries appended onto the end of various PHP files. Making this work effectively will require some MediaWiki configuration file editing, so we’ll leave it commented out and come back to it shortly.
The next two locations deal with the images directory, first forcing potential script files to be served as text, and next ensuring that direct requests for nonexistent files are routed back out to the main index file.
Next, we want to ensure Web browsers visiting the site hang onto static assets for as long as possible, in order to lessen server load. This is done by defining the extensions we want using a regex, and then setting expires max. This setting is communicated by the Web server to client browsers when they access the site.
The final two locations keep people out of places where they shouldn’t be. The cache directory doesn’t contain anything that’s meant to be user-accessible, and the LocalSettings.php file (which we’ll generate in a moment) has sensitive information in it.
PHP tweak
You might need to make a change to your PHP-FPM installation in order to make MediaWiki work properly. Check /etc/php5/fpm/php-fpm.conf for the following line, and if it’s not present, go ahead and add it:
security.limit_extensions = .php .html .php5
This will ensure that PHP-FPM knows it’s allowed to run php5 files. Even though we’re going to try to make sure we always use the regular php files, there’s always an edge case where some obscure extension decides to try to refer to the php5 files, so we want to make sure to cover that.
MediaWiki configuration
Reload Nginx and PHP-FPM if you haven’t already in order to make our changes live:
If everything’s working, you’ll see a screen like this:
This is a good screen. It means everything’s working. Hooray!
Credit:
Lee Hutchinson
This is a good screen. It means everything’s working. Hooray!
Credit:
Lee Hutchinson
Click the “set up the wiki” link to get started with the MediaWiki guided configuration. You’ll first specify your language of choice, and then MediaWiki will execute a prerequisites check on your Web server to make sure that it’s able to be installed. If you’ve been following the guides, there should be no issues here, and you should be able to continue.
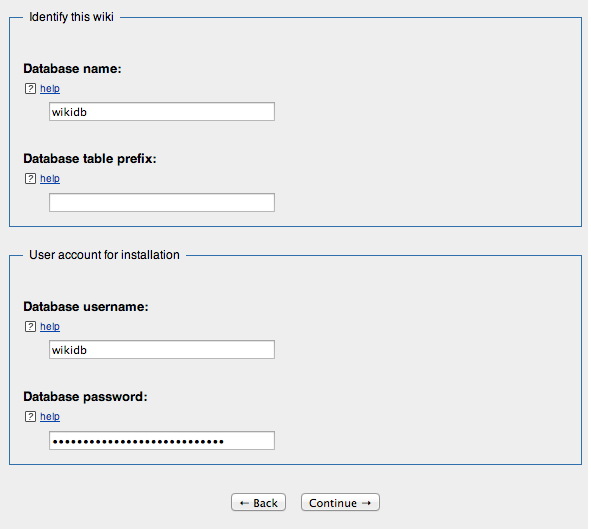
Next, you’re prompted for a MySQL database and username. Enter the database name and user credentials you previously created, leaving the database table prefix field blank.
Configuring the MediaWiki database.
Credit:
Lee Hutchinson
Next is the database settings setup screen. Leave the default options selected (“Use the same account as for installation,” “InnoDB” for the storage engine, and “Binary” for the database character set) and continue on.
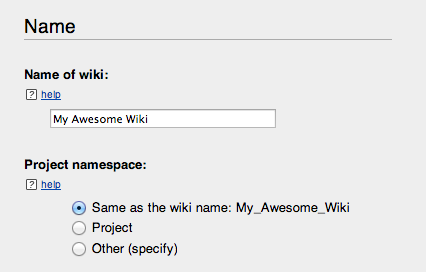
On the next screen, you can name your wiki and define an administrator account. Leave the “Project Namespace” setting at its default value and continue.
Giving the wiki a name.
Credit:
Lee Hutchinson
You have the ability to simply complete the installation at this point, but it’s wise to continue on and specify a few more things. The next screen gets into some interesting options about permissions and licensing. If you’re going to be using your wiki publicly at all, I recommend changing the first setting to “Authorized editors only,” which will ensure that only accounts you explicitly add to an editor’s group can add or change content. If you allow your wiki to be visible to the Internet, you will get spam accounts signing up and creating pages, so your options are to keep it LAN-only, to control editing, or to wage a never-ending account & page deletion battle with the spammers.
Below that, you can set a license footer to appear on each page. The subject of licensing is a complex one—far too complex to dive into here—but I use Creative Commons Attribution Non-Commercial Share Alike for my wiki. There’s a great explanation of exactly what this means on the linked page. You can choose what footer to append to your pages (or you can choose not to use any licensing footer at all).
You will likely want to toggle on “Enable file uploads,” which will let users upload images to go along with articles they create. There are potential security issues with turning this on, though, since it allows users to upload files which might contain attack payloads. The Nginx configuration we’re using does its best to minimize this threat, but it cannot be eliminated entirely. Be aware.
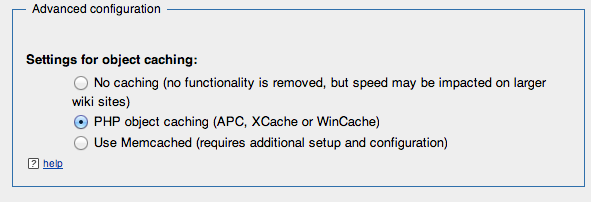
Finally, at the bottom of this screen, in the “Advanced configuration” section, turn on “PHP object caching.” This will enable MediaWiki to use your Web server’s APC cache (which we set up when we configured PHP-FPM back in part 3) as an object cache, stashing fully rendered pages there and speeding things up a bit.
Make sure to toggle this option in order to use APC as an object cache for MediaWiki.
Credit:
Lee Hutchinson
After setting all the options you’d like to set, you’re given one final chance to restart or change the configuration. If you’re happy with things, hit “continue” to have MediaWiki take the configuration info you’ve provided and go to work with it. You should see a screen looking something like this if it’s successful:
The installation has completed successfully, and you’ll next be downloading the completed configuration file and manually putting it in place on your server.
Credit:
Lee Hutchinson
The installation has completed successfully, and you’ll next be downloading the completed configuration file and manually putting it in place on your server.
Credit:
Lee Hutchinson
Clicking the final “continue” will cause MediaWiki to produce a file called LocalSettings.php (actually, it might cause MediaWiki to produce an SSL error if you don’t have HTTP set up—if this is the case for you, remove the “HTTPS” from the URL you’re redirected to and hit “enter” to reload the page). This file contains all of the config info we entered into the MediaWiki setup process, and we’ll need to take this file and stash it in our MediaWiki directory.
Copy the file to your Web server (using SCP from the command line or from your file transfer application of choice) and place it in /usr/share/nginx/html/wiki, then open it for editing.
Local settings file
There are a number of things we want to modify in LocalSettings.php. Firstly, the MediaWiki automatic installation has probably decided that your site should best be served via HTTPS. If you’ve got HTTPS functioning then this is fine, but if not, we’ll need to change things so that they’re done via HTTP. Locate the line reading $wgServer and replace the HTTPS with HTTP, if necessary:
$wgServer = "http://yourserver";
We also need to add two lines in order to enable support for nice URLs. Locate the portion of the config file where $wgScriptPath is defined, and in that block of code, add the following two lines:
The first boolean tells MediaWiki that you’re going to be using pretty URLs, and the second variable tells MediaWiki what those URLs are going to look like.
Final Nginx clean-up
Before you try to access your new wiki, there’s one thing left to do. Open up /etc/nginx/site-configs/wiki.conf and un-comment the rewrite line, so that it now looks like this:
Then reload Nginx, cross your fingers, and access your MediaWiki install in your browser at http://yoursite/wiki.
Function test
This is what you want to see:
If you see this, then congratulations: MediaWiki is installed and configured. Double-hooray!
Credit:
Lee Hutchinson
If you see this, then congratulations: MediaWiki is installed and configured. Double-hooray!
Credit:
Lee Hutchinson
If you’re looking at a screen like this, complete with the correct shortened URL, then congratulations—you now have a functional MediaWiki installation!
Try logging on with your admin account and creating a test page (which you can do by simply replacing “Main_Page” in the URL with something like “test page” and hitting enter, then following the on-screen instructions). If you can create pages, then you’re all set.
Role-based security
The final thing we’re going to do before we wrap up is modify MediaWiki’s security. Specifically, we’re going to change things such that newly-registered accounts go into the “users” group and make sure that group has very limited permissions. We’re then going to create another group, called “editors,” which has permission to create and change pages. The end result will be that anyone can register for an account, but only users in the “editor” group can change things, so you as the administrator will need to manually assign new users to the “editor” group before they can do anything. This is a good compromise between a fully-open and a fully-closed wiki, and it builds on the security template we chose during installation.
Security groups and their permissions are defined in the LocalSettings.php file. Open that file for editing and locate the following line:
Change this line to true. This will enable account creation for anyone, so you as the administrator don’t have to manually create accounts for everyone. If you want to be the only user who can create accounts, leave it set to false.
Then, at the very end of the file, paste this long list of permissions:
I won’t go through each of these individually, since we’d be here all night, but this big block reassigns a number of permissions from the “user” group to the “editor” group (which doesn’t exist yet, but which will be automatically created by MediaWiki now that it’s referenced in the config file).
Navigate to your wiki in a Web browser, and log in as the admin account you created during setup. Click “Special Pages” on the left sidebar, and then choose “User Group Rights” under the “Users and Rights” section. You should see the “editor” group listed, with a number of permissions; similarly, the “user” group should only have “Read pages” listed under its available rights.
The new “editor” group, created in response to that big block of text we pasted into the settings file, has permission to create and modify pages (among other things).
Credit:
Lee Hutchinson
The new “editor” group, created in response to that big block of text we pasted into the settings file, has permission to create and modify pages (among other things).
Credit:
Lee Hutchinson
To actually add a user to the editors group, log out as the admin and register a dummy user account, then log back in as the wiki administrator and head back to the “Special Pages” link. From there, click “User Rights Management,” then enter the name of the dummy user in the username field and click “Edit user groups”.
Adding the test user account I created to the “editor” group.
Credit:
Lee Hutchinson
Adding the test user account I created to the “editor” group.
Credit:
Lee Hutchinson
Tick the box next to “editor” to add this user to the editor group, give a reason if you’d like, and click “Save user groups.” The test user account is now able to create and edit pages.
Where to go from here
There are several things you could do next to prettify your Wiki—give it a favicon and a logo, both of which are customizable via the LocalSettings.php file. You could also set up e-mail on your Web server and enable MediaWiki’s e-mail facility, to help with account authorization and password recovery, though turning on e-mail is far beyond the scope of this guide.
There’s also an entire world of MediaWiki add-ons, though use caution—poorly programmed or badly maintained add-ons are a huge potential security risk. As with any Web application, keep the number of add-ons installed to a minimum. Use what you need, but no more!
Stay tuned…
The Web Served Bonus Round continues in a couple of weeks! Our little Web server is sporting quite a few services, but we’re gonna really ratchet things up in the next version, when we add not one, not two, but three separate things all at the same time. The main thrust will be installing Etherpad Lite, a real-time collaboration utility, but we’re gonna also toss in two buzzword-compliant support components: Node.js, which is required for Etherpad to run, and Redis, an ultra-quick, key-value store to hold Etherpad’s data. It’s gonna be fun!
Lee is the Senior Technology Editor, and oversees story development for the gadget, culture, IT, and video sections of Ars Technica. A long-time member of the Ars OpenForum with an extensive background in enterprise storage and security, he lives in Houston.


 Loading comments...