Skip to content
Tech

Linksys EtherFast Cable/DSL Router, Model BEFSR41

A breif rundown and a setup walkthrough of the Linksys EtherFast Cable/DSL …

Codepoet | 0
Story text

Introduction

Manufacturer: Linksys
'Net price: ~$150
Rating: 8

After reading Ator's excellent home-networking installation guide, I started to realize how dysfunctional my home network was. Up to this point, I was relying on a dual-NIC configured Win2K box running the (very good) Wingate connection-sharing software. I had one NIC going out to the Internet (via my 1Mbps DSL modem), and the other NIC going directly to a Win98-based laptop, which ran the Wingate client.

Recently, I've added a Linux/WinCE box and an Amiga 3000 system, both configured with Ethernet connectivity. I wanted to be able to have a LAN running between all four machines, and adding additional NIC cards to my Win2K box was now out of the question. Additionally, I wanted these machines to be able to share my Internet connection. Obviously, I needed a router and a hub. Luckily, Linksys provides both a router and hub combination in one device, along with NAT/DHCP/firewall functionality.

After considering the Netgear RT311 Internet Access Gateway Router (I hadn't discovered the Netgear RT314), and the D-Link DI-701 Gateway/Firewall, I settled on the Linksys model reviewed here. Why?

Overview of Features

The Linksys BEFSR41 has the following feature-set:

  • NAT functionality, allowing multiple IP-addresses on the private LAN to
    access the Internet over a single connection.
  • Built-in firewall via port-inspection/blocking.
  • 10Mbps connection speed to the Internet (IEEE 802.3 10BaseT).
  • Built-in 10/100Mbps four-port switch (IEEE 802.3 10BaseT, 802.3u
    100BaseTX). Devices on the LAN which are
    equipped with 100Mbps NICs can communicate with each-other at maximum speed,
    while Internet communications occur at a maximum of 10Mbps.
  • DHCP client functionality built-in, for configurations where the Internet
    connection's IP-address is dynamically assigned.
  • DHCP server functionality built-in, with up to 253 DHCP-assigned
    IP-addresses.
  • PPPoE support (not tested).
  • Up-link port for secondary switches/hubs (like the $30 Linksys EtherFast
    5-port Switch), or connection to the cool (but overpriced) Linksys EFG20
    20GB Network Attached Storage (NAS) device with built-in print-server
    functionality.
  • Supports a De-Militarized Zone (DMZ) for a single LAN-based computer.
  • Blocking of specific LAN-based computers from Internet access (great for
    when Junior has misbehaved).

Comparison of Features

Features Linksys BEFSR41 D-Link DI-701 Netgear RT311/RT314
Price ~ $150 $90 $120/$160
Built-in Switch or Hub? Yes No (add $50) No/Yes
Supports VPN/PPTP? Yes Maybe Yes with configuration
Graphical Configuration Tool? HTTP-based Requires Windows HTTP-based
Stackable? Yes Sort of Yes


What's Included

  • Documentation:
    • User's Manual
    • FAQ Sheet
    • Quick Installation Sheet
    • Product Registration Card
  • Cables:
    • Only a power-adapter and power-cable was included.
  • The Linksys BEFSR41 device

RTFM

The documentation is quite good. For the tech-savvy types that read Ars, the manual is MORE than adequate. For a complete computer beginner, I think the manual is quite good, and the setup/configuration is no more complicated than configuring Dial-Up Networking or the Network Control Panel stuff. Indeed, Linksys even provides a Quick Installation sheet which covers most of the common configurations (Win95/98 screen-shots), step-by-step. Still, there were some presentation issues that I'll mention for the benefit of Linksys and as a warning to potential buyers: the use of bolding could have been better where it discusses certain features. Important information, e.g., like the fact that certain router features only work when the router is configured in non-DHCP mode, was often buried in the middle of a seemingly innocuous paragraph, where it could be easily overlooked. If you want to have a look at the docs, they're available online from Linksys in PDF format.

Cabling

linksys_cable.jpg (73172 bytes)
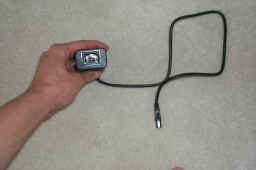
The power-cable is almost perfect, since it doesn't terminate in a wall-wart the size of a brick. Instead, it consists of a small power-adapter that connects to the Linksys, and a standard 3-prong male-to-female power-cable that mates the power-adapter to the wall-socket.

Why did I say near-perfect, then? Because the cable on the power-adapter is too short compared to the 3-prong standard power-cable you attach. What tends to happen here, at least for me, is that the power-adapter ends up hanging in mid-air behind my desk, providing a pendulum-like weight which drags the router backwards towards the abyss. If the cable was longer, then the small brick could rest on the floor, and provide less drag on the back of the device.

Look and Feel

linksys_top.jpg (88149 bytes)
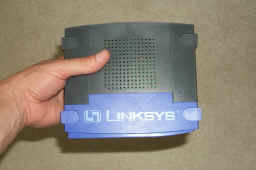
The Linksys itself is fairly compact, although I believe it could have been smaller. Because of Linksys' stackable format for many of their devices, they're forced into following that form-factor. You can see from the picture on the left that the unit is relatively small, and it's light–it weighs about 12 shots of tequila (12 ounces). Those indentations on the top of the device support the feet of other stackable Linksys devices.

While I think that the stackable format is uber-cool, I've noticed that Linksys has four incompatible stackable formats for their devices, which is ultra-crappy. The interesting 20-Gig NAS EFG20 won't stack here, although it'll happily stack with other EFG20 devices. The nice Keyboard/Video/Mouse (KVM) switches from linksys won't stack here either (which is too bad, since I'm going to be buying one shortly). With such devotion to stackability, one might expect their products to stack better!

linksys_rear.jpg (115324 bytes)
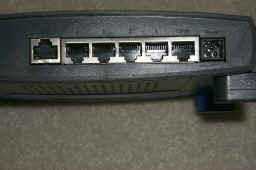
About the only devices you'll be able to stack nicely with the BEFSR41 are the simple 5-port hub, 5-port switch, or the integrated 4-port switch and 2-port print-server device.

Front 'n Back

The rear of the device sports the WAN connection to your external cable/DSL-modem, the four-port switch with uplink option, and the power connector. You can get a closer look by clicking here. The front of the device sports a number of useful LEDs, including:

  • Power – duh!
  • Link/Act (x4) – Solid-green indicates a connected device is powered-on,
    and flickering-green indicates RX/TX activity on that connection.
  • Full/Col (x4) – Solid-green indicates full-duplex connectivity, and
    flickering-green indicates collisions.
  • 100 (x4) – Orange indicates 100Mbps connection.
  • Link – Green indicates a successful connection between the Linksys and the
    cable/DSL-modem.
  • Act – Green-flickering indicates RX/TX activity to the cable/DSL-modem.
  • Diag – Red indicates self-diagnostics, and only appears briefly during
    boot-up.

Here's a shot of the unit on my desk.


linksys_and_modem.jpg (88053 bytes)

Gettin’ in operation

Out of the Box Experience

If your ISP assigns you a dynamic IP-address using DHCP, you’ll literally be able to just plug the Linksys into the output from the cable/DSL-modem, and plug your PC into Port 1 of the Linksys.? Voila, you’re instantly connected/communicating.? This is because you’ll previously have configured your PC to have a dynamic IP-address in its network configuration, and instead of it getting its IP-address and DNS server assignments directly from the ISP, it will now get them from the Linksys. The exception would be on a network were your ISP using a hybrid form of DHCP that will only supply IPs to MAC addresses it knows (and no, it’s not the same thing as bootp). In those instances, you’ll need to call your ISP, and give them the MAC address of your router. It’s not recommended that you tell your ISP that it’s a router, however.

My specific ISP provides me with a static IP-address.? So, I needed to configure the Linksys with that IP-address and the default-gateway and DNS addresses. Let me give you a tour of this devices setup features.

Configuring the Device

Logging In, Basic Setup

In order to configure the box, you simply open a browser on a computer behind the router to http://192.168.1.1. You’ll be greeted with an initial log-in form (the device has a default username/password).? After logging-in, the web-based Setup screen appears where you can change the default LAN address of the Linksys (from 192.168.1.1 to something else), as well as configuring the WAN, default-gateway, and DNS IP-addresses for the device.

wpe12.jpg (93537 bytes)
?

Additionally, this first page allows you to configure PPP Over Ethernet (PPPoE) support (Enabled or Disabled).? Since my ISP doesn’t use PPPoE, I did not test this functionality.? However, PPPoE seems like a system devised by broadband providers to utilize bandwidth more efficiently in their central-office location.? Instead of assigning a fixed amount of bandwidth to each user, even when that user is not actively using his connection, the connection is handled just like a dial-up modem connection, complete with an idle-time based disconnect. Some people seem to love it, others seem to hate it. In any case, with this unit, you can use it ;)

Firmware Upgrades

Linksys ships a Windows-based firmware upgrade utility, as well as a JAVA-based built-in firmware upgrade utility for users of other platforms.? I used the Windows-based firmware upgrade utility exclusively, and was unable to get the JAVA one to even work. Clicking on the “Browse” button that was shown on the HTML-based upgrade-page would result in a busy-pointer for ever. Additionally, since the Java-based firmware upgrade is a new feature in the recent firmware, it isn’t covered in the documentation at all.

I checked the firmware on my new Linksys once I was up and running, and discovered that it was many months old.? Grabbing the latest firmware from the Linksys support web-site, I managed to quickly upgrade the firmware with only one problem: it blew away my previous settings! This is not the usual procedure in many other firmware upgrade paths (like flashing your BIOS for some units).? It is unfortunate that the firmware upgrade destroyed my settings, and required me to re-enter all of my data.? It is additionally troublesome that there was no warning about the loss of my existing settings.

DHCP vs. Static IP Assignment

Initially, I configured the Linksys to use DHCP completely for all LAN-based connections.? This allowed me to configure all my PCs (Win2K, Linux, Amiga, and Win98 laptop) to use DHCP for their IP and DNS-addresses.? I was in bliss.? Every PC on my LAN would get its DNS servers from the Linksys settings, and would dynamically get their IP addresses.

Bliss was short-lived. (Isn’t it always?)? I soon discovered that key-features (port-forwarding, filtering, DMZ, which we’ll get to in a minute) would not work with a DHCP-based configuration.? Get out the Bounce, I’ve gotta use Static. The only real problem with using static IP-addresses is that you must manually assign each of your devices on the LAN a unique IP-address, as well as entering in the default-gateway and DNS information on each device.? If your ISP ever changes their DNS addresses, you can’t update them in a single location (in the Linksys router) and have that propagate to each of your LAN-connected devices.

wpe10.jpg (67219 bytes)

Port-Forwarding

This feature is important for advanced users who wish to expose specific ports to other Internet users, and forward requests to those ports on to a specific machine on the Linksys controlled LAN.? A primary example is an FTP or HTTP server running on your LAN, which you want available to the Internet. Let’s say the PC hosting the HTTP/FTP server is at LAN address 192.168.1.2–it’s your Linux box.? You would simply forward all requests to ports 80 (HTTP) and 21 (FTP) on your WAN IP (the IP that your ISP gives you) to 192.168.1.2.? This setup is accomplished via the Advanced section of the web-based Setup.? The Port-Forwarding page also gives you a handy reference of port-numbers and their common purposes.

When you try to get network-gaming to work on this device, be prepared to visit this page alot.? Many internet games, as well as instant-messaging and collaboration software, require specific TCP/UDP ports to be available.? If you know that information, then you must open up those specific ports with this page.

A beta-version of the Linksys firmware provides the ability to specify port-ranges which are open for a specific IP-address on the LAN. The non-beta firmware doesn’t use port-ranges, and has a fixed number of ten ports that can be mapped. For example, if you needed to map 23000-23030 to a specific IP-address on your LAN, you’d be out of luck with the non-beta firmware, since each port must be entered. The beta firmware will take a port-RANGE, and assign it to a specific IP-address on your LAN. (NOTE: In both cases, you can port-map different ports, or port-ranges, to the same local IP-address).

An example of Port-Forwarding is where your public IP-address is 1.2.3.4, but you have two computers (192.168.1.2 and 192.168.1.3) on your Linksys (192.168.1.1).? If you’ve configured 192.168.1.2 to have Port-Forwarding for port 80 (HTTP), then users on the Internet can surf to HTTP://1.2.3.4/ and get the HTTP-server on your LAN at 192.168.1.2.? Meanwhile, the machine at 192.168.1.3 won’t see any traffic originating from the Internet.

Some more cool features

Loop-back

An extremely important piece of functionality which goes along with Port-Forwarding is the Linksys’s loop-back feature.? This feature allows requests on the LAN to your external IP-address (as assigned by your ISP) to actually get redirected internally to the specific IP-address which can handle that functionality.

Using the example from the Port-Forwarding section, if machine 192.168.1.3 tries to access HTTP://1.2.3.4/, they will automatically get looped-back to 192.168.1.2 without actually going out to the Internet.? What’s the big deal?? Well, if you’ve assigned a domain-name to your address 1.2.3.4, say onetwothreefour.com, you now now access your local HTTP server by using its name directly, instead of having to use 192.168.1.2 from machines on the LAN.

Filtering

By entering in specific LAN IP-addresses, those users can be prevented from accessing the Internet, although they retain access to the LAN itself.

De-Militarized Zone… a must for gamers

The DMZ feature can be critical for allowing one machine (without sensitive data or information) to be completely “on” the Internet.? If this is a home-network with a serious gamer, the gaming rig is quite often not configured as the HTTP/FTP server.? You still maintain firewall protection for your other LAN-based devices, and also provide full capabilities to the one specific IP-address. If your roomate happens to be Carl, this is a feature you’ll need.

Consider that before installing a NAT/router/firewall/switch device such as the Linksys, you were most likely running your primary PC connected directly to the Internet, and wide open for all kinds of attacks.? This will remain true for the DMZ machine.? (See the excellent ShieldsUp! site for information on nasty port-sniffers, personal firewall s/w, and tests that can determine if your current Internet-connected PC is safe). Because of the variety of multiplayer games and their various configurations, configuring the Linksys for network gaming can be a challenge for users who want to keep their LAN as secure as possible, especially if you intend on using it for LAN gaming parties which need Internet connectivity.

For gaming configurations that involve multiple machines behind the router, I’d recommend you try the following:?

  • The beta Linksys firmware, version 1.33 or higher.? This will allow for port-ranges to be mapped, and not just single port entries.
  • Port information for the specific game you’re trying to play.? Additionally, if you’re multiple instances of a multiplayer game across your LAN machines, you’ll need to be aware of the special tweaks for each game that sets the specific port-number for each instance.? For example, if you’re running three copies of Q3A on your LAN, each copy will have to use a seperate and distinct port-number.? And those port-numbers will have to be set properly in the port-forwarding section of the Linksys configuration.

Why not just open everything up with DMZ? You simply can’t. Only one machine can be in the DMZ. An excellent source of information regarding port-numbers and gaming with the Linksys can be found here.

Performance

Okay, so you’ve got this thing configured and tuned, and your LAN is humming along with full internet-access through a single shared broadband pipe.? Perfect!? Exactly why you shelled out the $150.? But how does it perform?

In a word – excellent!

Using a variety of benchmarking techniques (bandwidth meters from MSN and 2wire, large file downloads over HTTP and FTP, and LAN-based transfers), I couldn’t really detect any performance degradation with my Internet connection speeds as compared to my previous setup. As a quick comparison, I did some FTP transfers between my local machines using an ultra-cheap-o hub, and scored 629K/sec downloading from the Win2K machine to the 10Mbps equipped laptop.? With the Linksys, this number actually climbed slightly to 631K/sec.? The 100Mbps-to-100Mbps connectivity of the Linksys switch seems to work great, with my Linux box downloading the same file at 3.9MB/sec.

Conclusion

What can I say?? The thing just works.? Out of the box, in DHCP mode, I had all four of my machines connecting to the Internet in under 5-minutes.? A brand-spanking new install of Corel Linux automatically configured itself for DHCP, and Netscape was happy.? My Amiga had no problems reaching the ‘net.? The Win98 laptop (a crawling 133MHz Pentium) worked, and it no longer needed the Wingate client software installed.?The Win2K machine was happy as a pig in…, and I managed to free up a PCI slot which was being used for that secondary NIC.

After configuring the Linksys for static IP-addresses, I was able to allow HTTP and FTP services running on the Win2K or Linux config to be exposed to external traffic.? Gaming and ICQ worked from a designated DMZ machine on the LAN (Q3A and Unreal Tournament were tested in this configuration).

For those people considering setting up a cheap Linux box as a NAT server, with dual NIC cards and a switch/hub for the LAN, I’d say *STOP*.? Even a cheap old P133 with 32-Megs and dual NICs is probably worth about the same as the Linksys.? Unless you really enjoy wasting your time, it probably just makes more sense to buy the Linksys.? If you’re setting up a more expensive Linux box as an HTTP server, and want to use it as a NAT server also, it may make more sense.

My only real gripe with the Linksys is the way it doesn’t handle DHCP and certain features, when it could easily do the following:

  1. The device knows which physical LAN ports on the back have been assigned which DHCP-based IP-addresses
  2. The port-forwarding, filtering, and DMZ could be based on physical LAN ports, rather than static IP-addresses.

By using this methodology, the Linksys would know that the Win2K machine on physical port #1 released its DHCP lease of address 192.168.1.2, and renewed its DHCP lease with the new address of 192.168.1.13.? The port-forwarding and filtering configuration of the Linksys could then just refer to physical port #1, and it wouldn’t have to worry about the non-static IP-address.

I have to subtract a bit for the manual’s layout, owing to the fact that I believe this product should be aimed at the newbie a bit better. Also getting a demerit, two in fact, is the firmware upgrade utility, one for toasting my existing settings, and another for not working in Java mode. Finally, I have to deduct some love on account of the fact that port-mapping/filtering only work in static-mode.

In conclusion, the Linksys device is a simple and cost-effective way to get a home LAN connected to the Internet through a single broadband-enabled connection, and scores an 8 overall.

0 Comments

Comments are closed.